You can choose between two methods:
- Using Firebase Functions
- Using Next.js API routes (coming soon)
Setting Up the Stripe Webhook
You need to create a webhook endpoint in the Stripe Dashboard and configure your Firebase Secret Manager.
1
Create a New Webhook in Stripe
- Go to your Stripe Dashboard → Developers → Webhooks
- Click “+ Add endpoint”
- Enter your Firebase HTTPS function URL (should look like this after deployment, we will edit later):
https://us-central1-YOUR_PROJECT.cloudfunctions.net/stripeWebhooks - Under “Select events to send”, enable the following events:
checkout.session.completed– triggered when a checkout session (payment or subscription) completes.customer.subscription.updated– triggered when a subscription is modified (upgrade, downgrade, cancel).invoice.payment_succeeded– triggered when an invoice is successfully paid (renewals, upgrades).
- Click Add endpoint to save.
Once created, Stripe will show you a Webhook Signing Secret (starts with whsec_...).
Copy this value — you’ll need it for Firebase.
Option 1: Firebase Functions (Recommended)
1
Store Webhook Secret in Firebase Secret Manager
Use the Firebase CLI to securely store your Stripe secrets:
firebase functions:secrets:set STRIPE_SECRET_KEY
firebase functions:secrets:set STRIPE_WEBHOOK_SECRET
When prompted, paste your actual keys:
- STRIPE_SECRET_KEY: your Stripe secret API key (starts with
sk_live_...orsk_test_...) - STRIPE_WEBHOOK_SECRET: your webhook secret from Stripe
2
Deploy stripe-webhooks function
The Firebase Functions webhook handler is located at:
functions/hooks/stripe-webhooks.ts
Make sure you include it in functions/index.ts
Now you're ready to deploy your webhook handler function:
cd functions
firebase deploy --only functions
or
cd functions
npm run deploy
You should see:
3
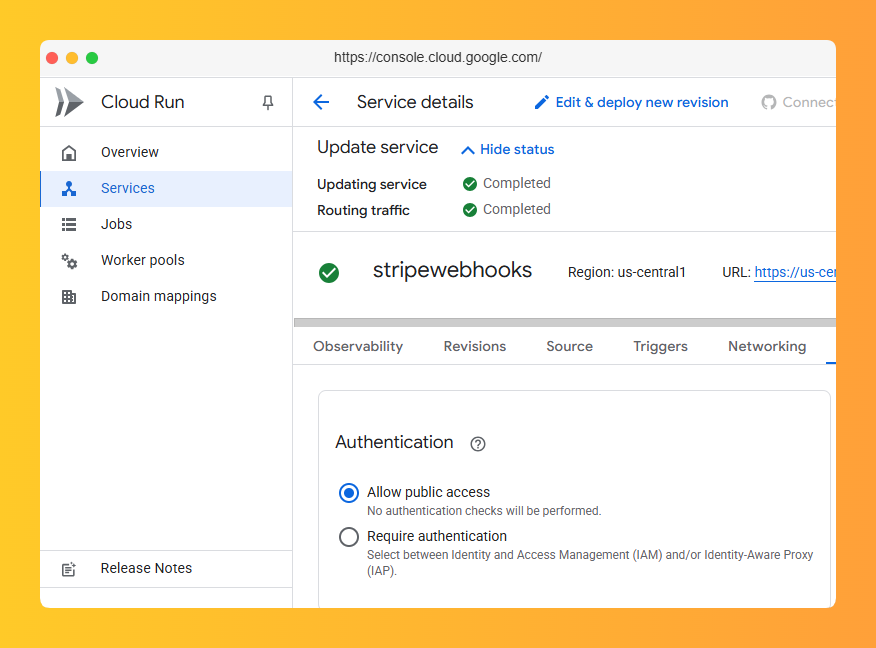
Set stripe webhooks to public access
Before you test your webhook, you may need to set Stripe webhooks to public access
- Go to https://console.cloud.google.com/ and search Cloud RUN
- Open Services Menu in the sidebar
- Go the stripeWebhooks functions -> Security -> Allow public access -> Save
4
Test the Webhook (Optional)
Use the Stripe CLI to send test events:
stripe listen --forward-to https://us-central1-YOUR_PROJECT.cloudfunctions.net/stripeWebhooks
Then trigger test events:
stripe trigger payment_intent.succeeded
stripe trigger customer.subscription.created